

MAC's masonry education is provided by
Walter A. Laska, President - Masonry Technologies
This learning course is approved for .5 (1/2) AIA or PDH accreditation.
Read this article and answer the 5 questions below to receive credit.
Learning Objectives:
- Explore multiple design considerations, and how precast concrete planks are connected to concrete masonry wythe.
- Learn how precast concrete planks should intersect with load-bearing bond beams.
- Learn how precast concrete planks should interact with non-load bearing wythes.
- Learn how the modular design of the concrete masonry wythe uniformly interacts with standard 8" thick concrete masonry wythes.
Connecting Pre-cast Concrete Plank to Concrete Masonry Wythe


Click drawings to expand to full size.
Combining loadbearing and non-loadbearing masonry wythes with floors and roofs consisting of precast concrete planks can make for efficient, economical construction and solid, firesafe buildings. But the connections between the two systems must be detailed carefully for the building to be structurally sound.
The masonry wythe-precast concrete floor and roof connections should provide lateral bracing of the wall against wind loads. This connection also should assist in the transfer of shear stresses. In the case of bearing walls, they should transfer gravity loads to the foundation.
Structural considerations should always govern the design of these wall connections, but the designer should also consider constructability. Simpler construction generally is less expensive and easier to construct.
Precast Concrete Plank/Bearing Wall Connections
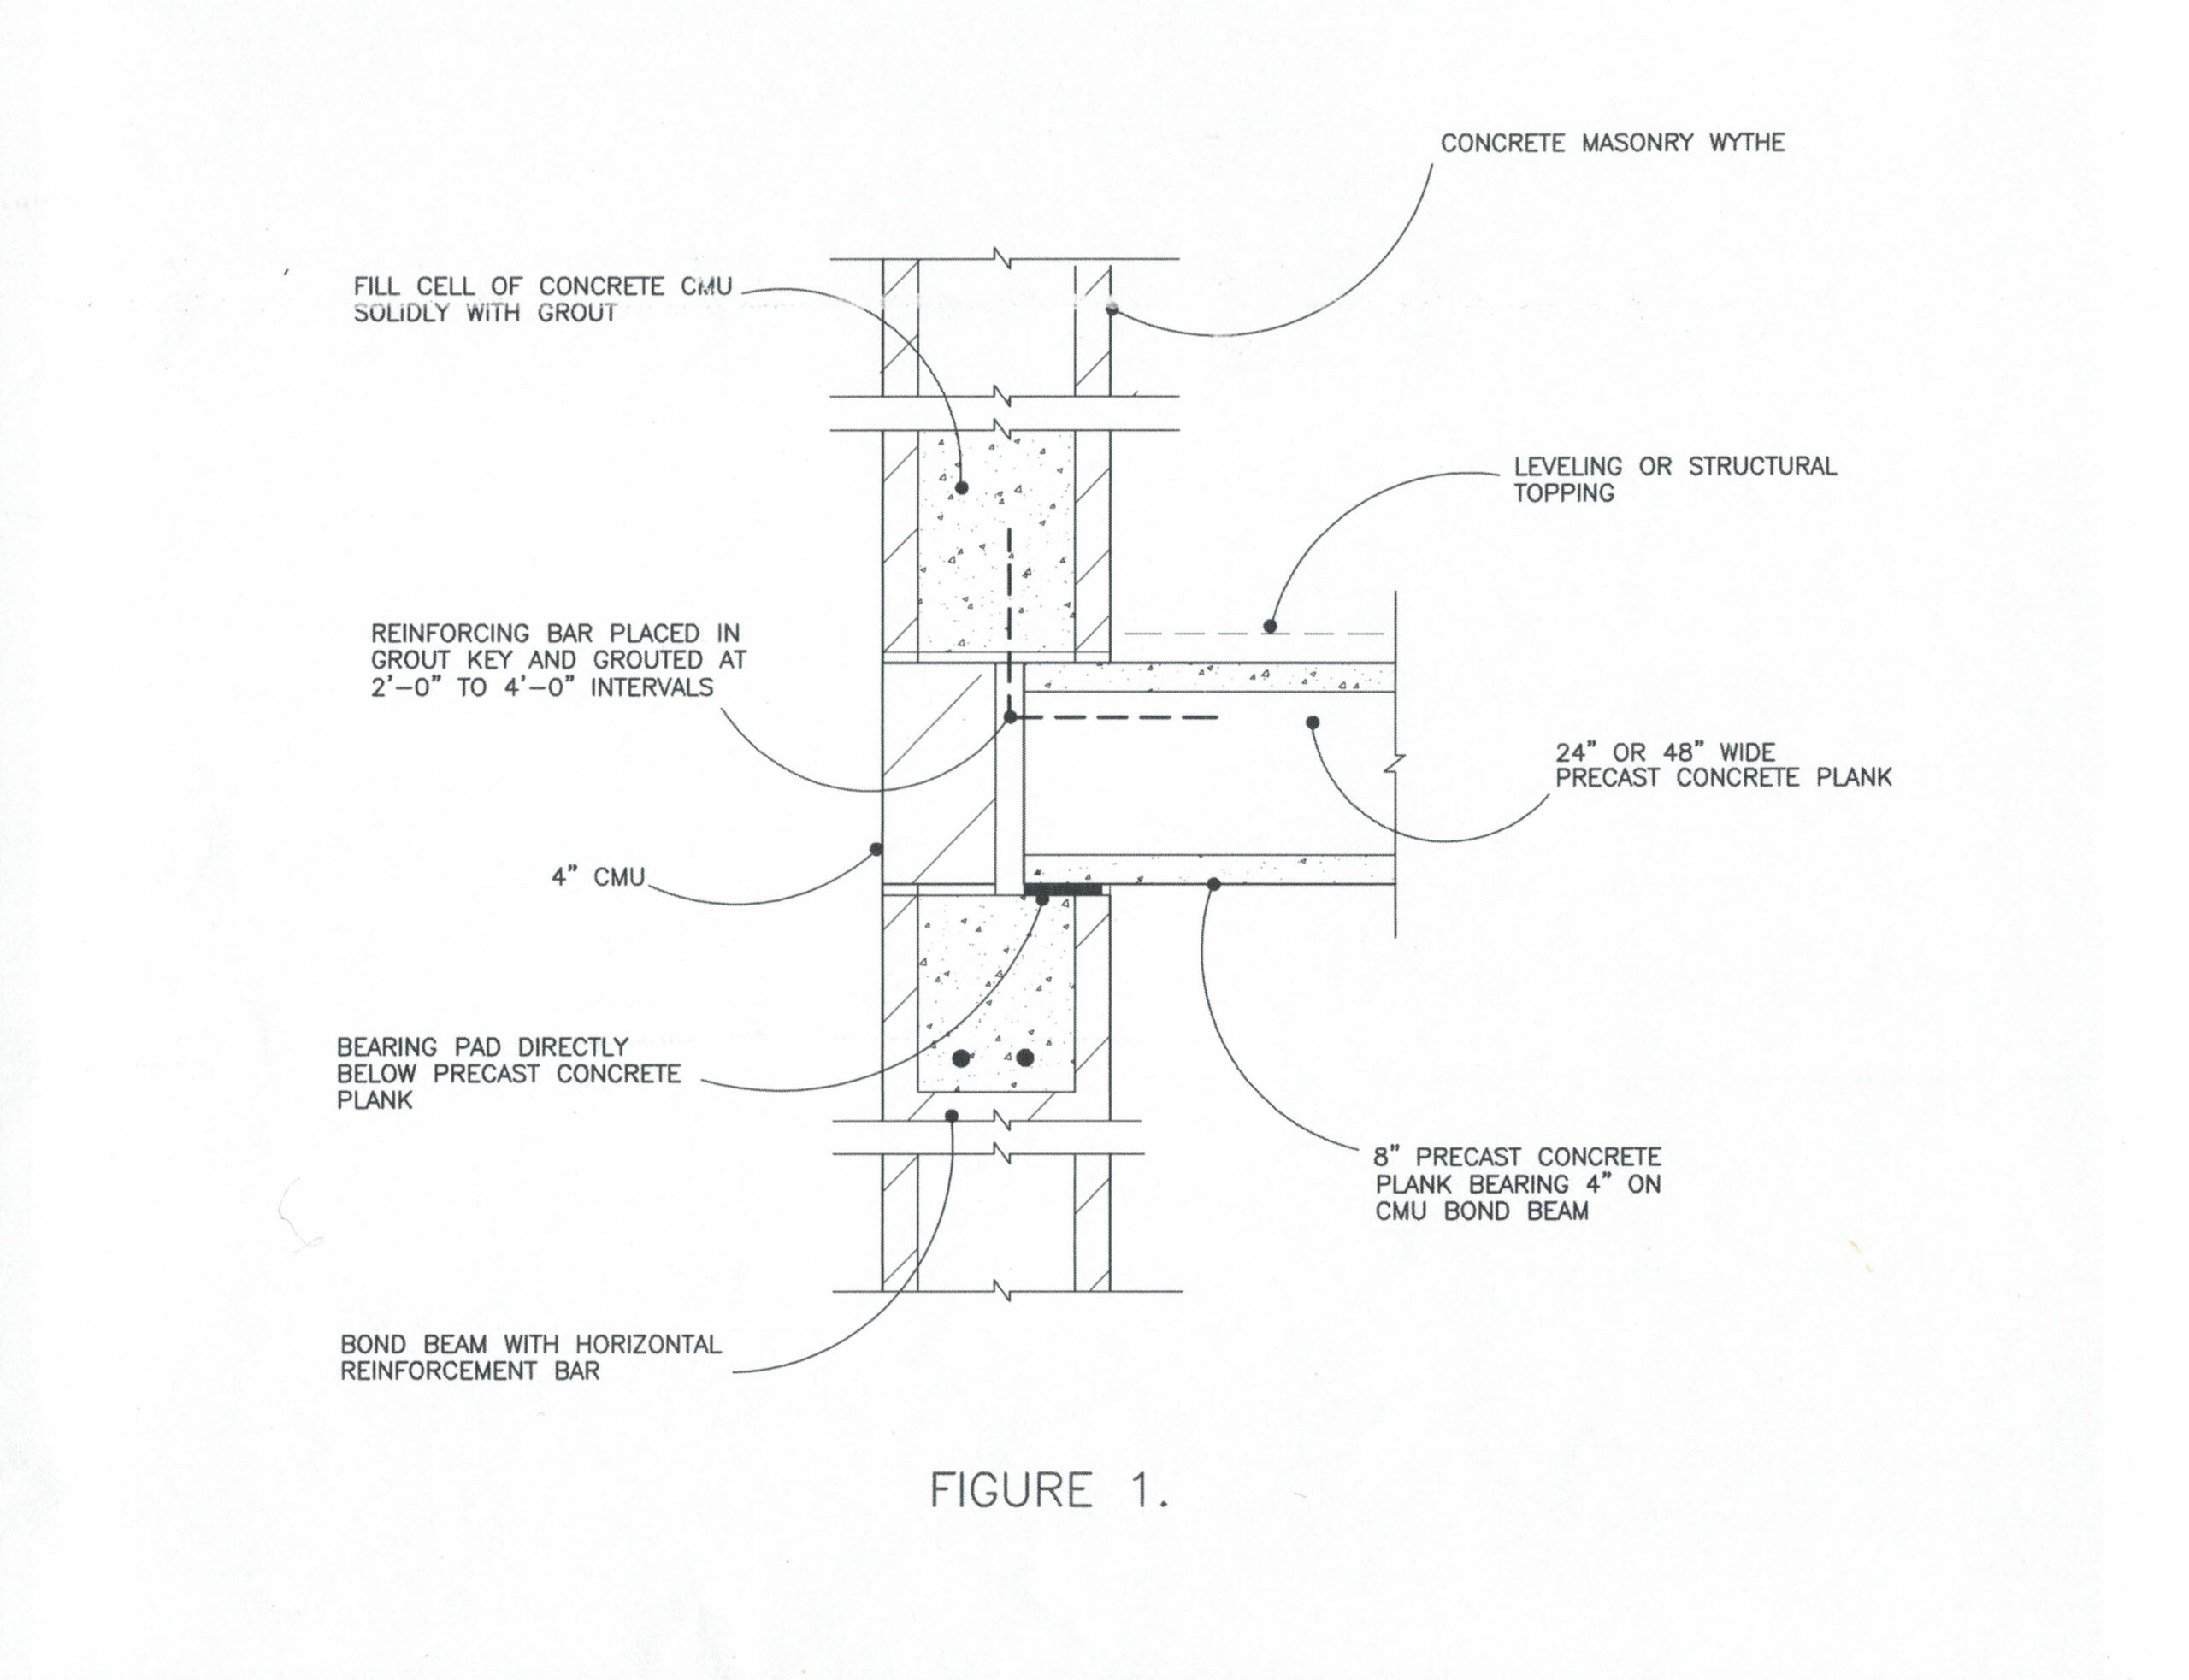
A common way to anchor precast concrete with load bearing concrete masonry wythes is with a reinforcing bar, field bent at a 90º angle. The horizontal end of the reinforcing bar is then set in a grout key that is formed between the precast concrete planks when they are installed. After placement, the key is solidly grouted.
The vertical end of the reinforcing bar is positioned into the open cell of a concrete masonry unit located directly above. After placement in the cells, the cells are solidly grouted.
If the spacing of the reinforcing bar is required to be other than the 2 ft. or 4 ft., the horizontal leg of the reinforcing bar can be set into the structural concrete topping.
A structural engineer should determine the size and spacing of the reinforcing bar.
It should be noted that precast concrete planks are typically manufactured in 2 ft. and 4 ft. widths. They are also manufactured in 8 inch thicknesses, which makes them ideal to incorporate into an 8” high concrete masonry wythe.
Precast concrete planks must be set upon a continuous bond beam constructed in the concrete masonry wythe. The bond beam will provide equal distribution of loads throughout the concrete masonry wythe.
A bearing pad must be installed between the precast concrete plank and the bond beam below. The bearing pad will accommodate any irregularities in the surface of the bond beam and contribute to load uniformity in the concrete masonry wythe.
The vertical end of the reinforcing bar is set into a cell of a concrete masonry unit. The cell should be grouted 100% solid to achieve a maximum connection between the concrete masonry wythe and the precast concrete plank. This connection will achieve a positive bearing and a lateral connection (Figure 1).
Another connection may be feasible. At this connection, the precast concrete plank can be positively bonded to the concrete masonry wythe by solidly grouting the precast concrete plank core and the adjacent wall cavity. This cavity is created by installing a 4-inch concrete masonry unit on top of the bond beam, adjacent to the precast concrete plank.
A reinforcement bar should be set into the bond beam as the concrete masonry is being constructed. The size and placement of this reinforcement bar should be determined by the structural engineer (Figure 2).
Also, a Styrofoam plug should be installed in all of the precast concrete plank cores to be grouted. Typically, precast concrete plank manufacturers will provide the plank with the Styrofoam inserts pre-installed.
Plugging the precast concrete plank cores creates a continuous grout cavity. When the grout is poured, it flows into the wall cavity and into the adjacent plugged concrete masonry plank cores.
When the grout cures, a positive single connection is formed between the concrete masonry wythe, the reinforcing bar, and the adjacent precast concrete plank. The grout must be properly cured prior to continuing the construction of the concrete masonry wythe.
Nonload-Bearing Concrete Masonry Wythes
For nonload-bearing concrete masonry wythes (concrete wythes parallel to the planks) the most important consideration is to laterally brace the concrete masonry to the concrete masonry wythe.
One common method requires the precast concrete plank adjacent to the concrete masonry wythe to terminate adjacent to the concrete masonry wythe at 2 ft. to 4 ft. intervals. Openings are then created above the cores in the precast concrete planks. Styrofoam plugs placed within the precast concrete plank core openings, form a grout cavity. A strap anchor is then installed on top of the precast concrete plank. The anchor is set with the downturned end positioned into the precast concrete plank core, and the upturned end is positioned in the cell of the concrete masonry wythe. The block cell and the grout pocket in the precast concrete plank are then grouted solid. This connection will provide lateral bracing for the wall (Figure 3).
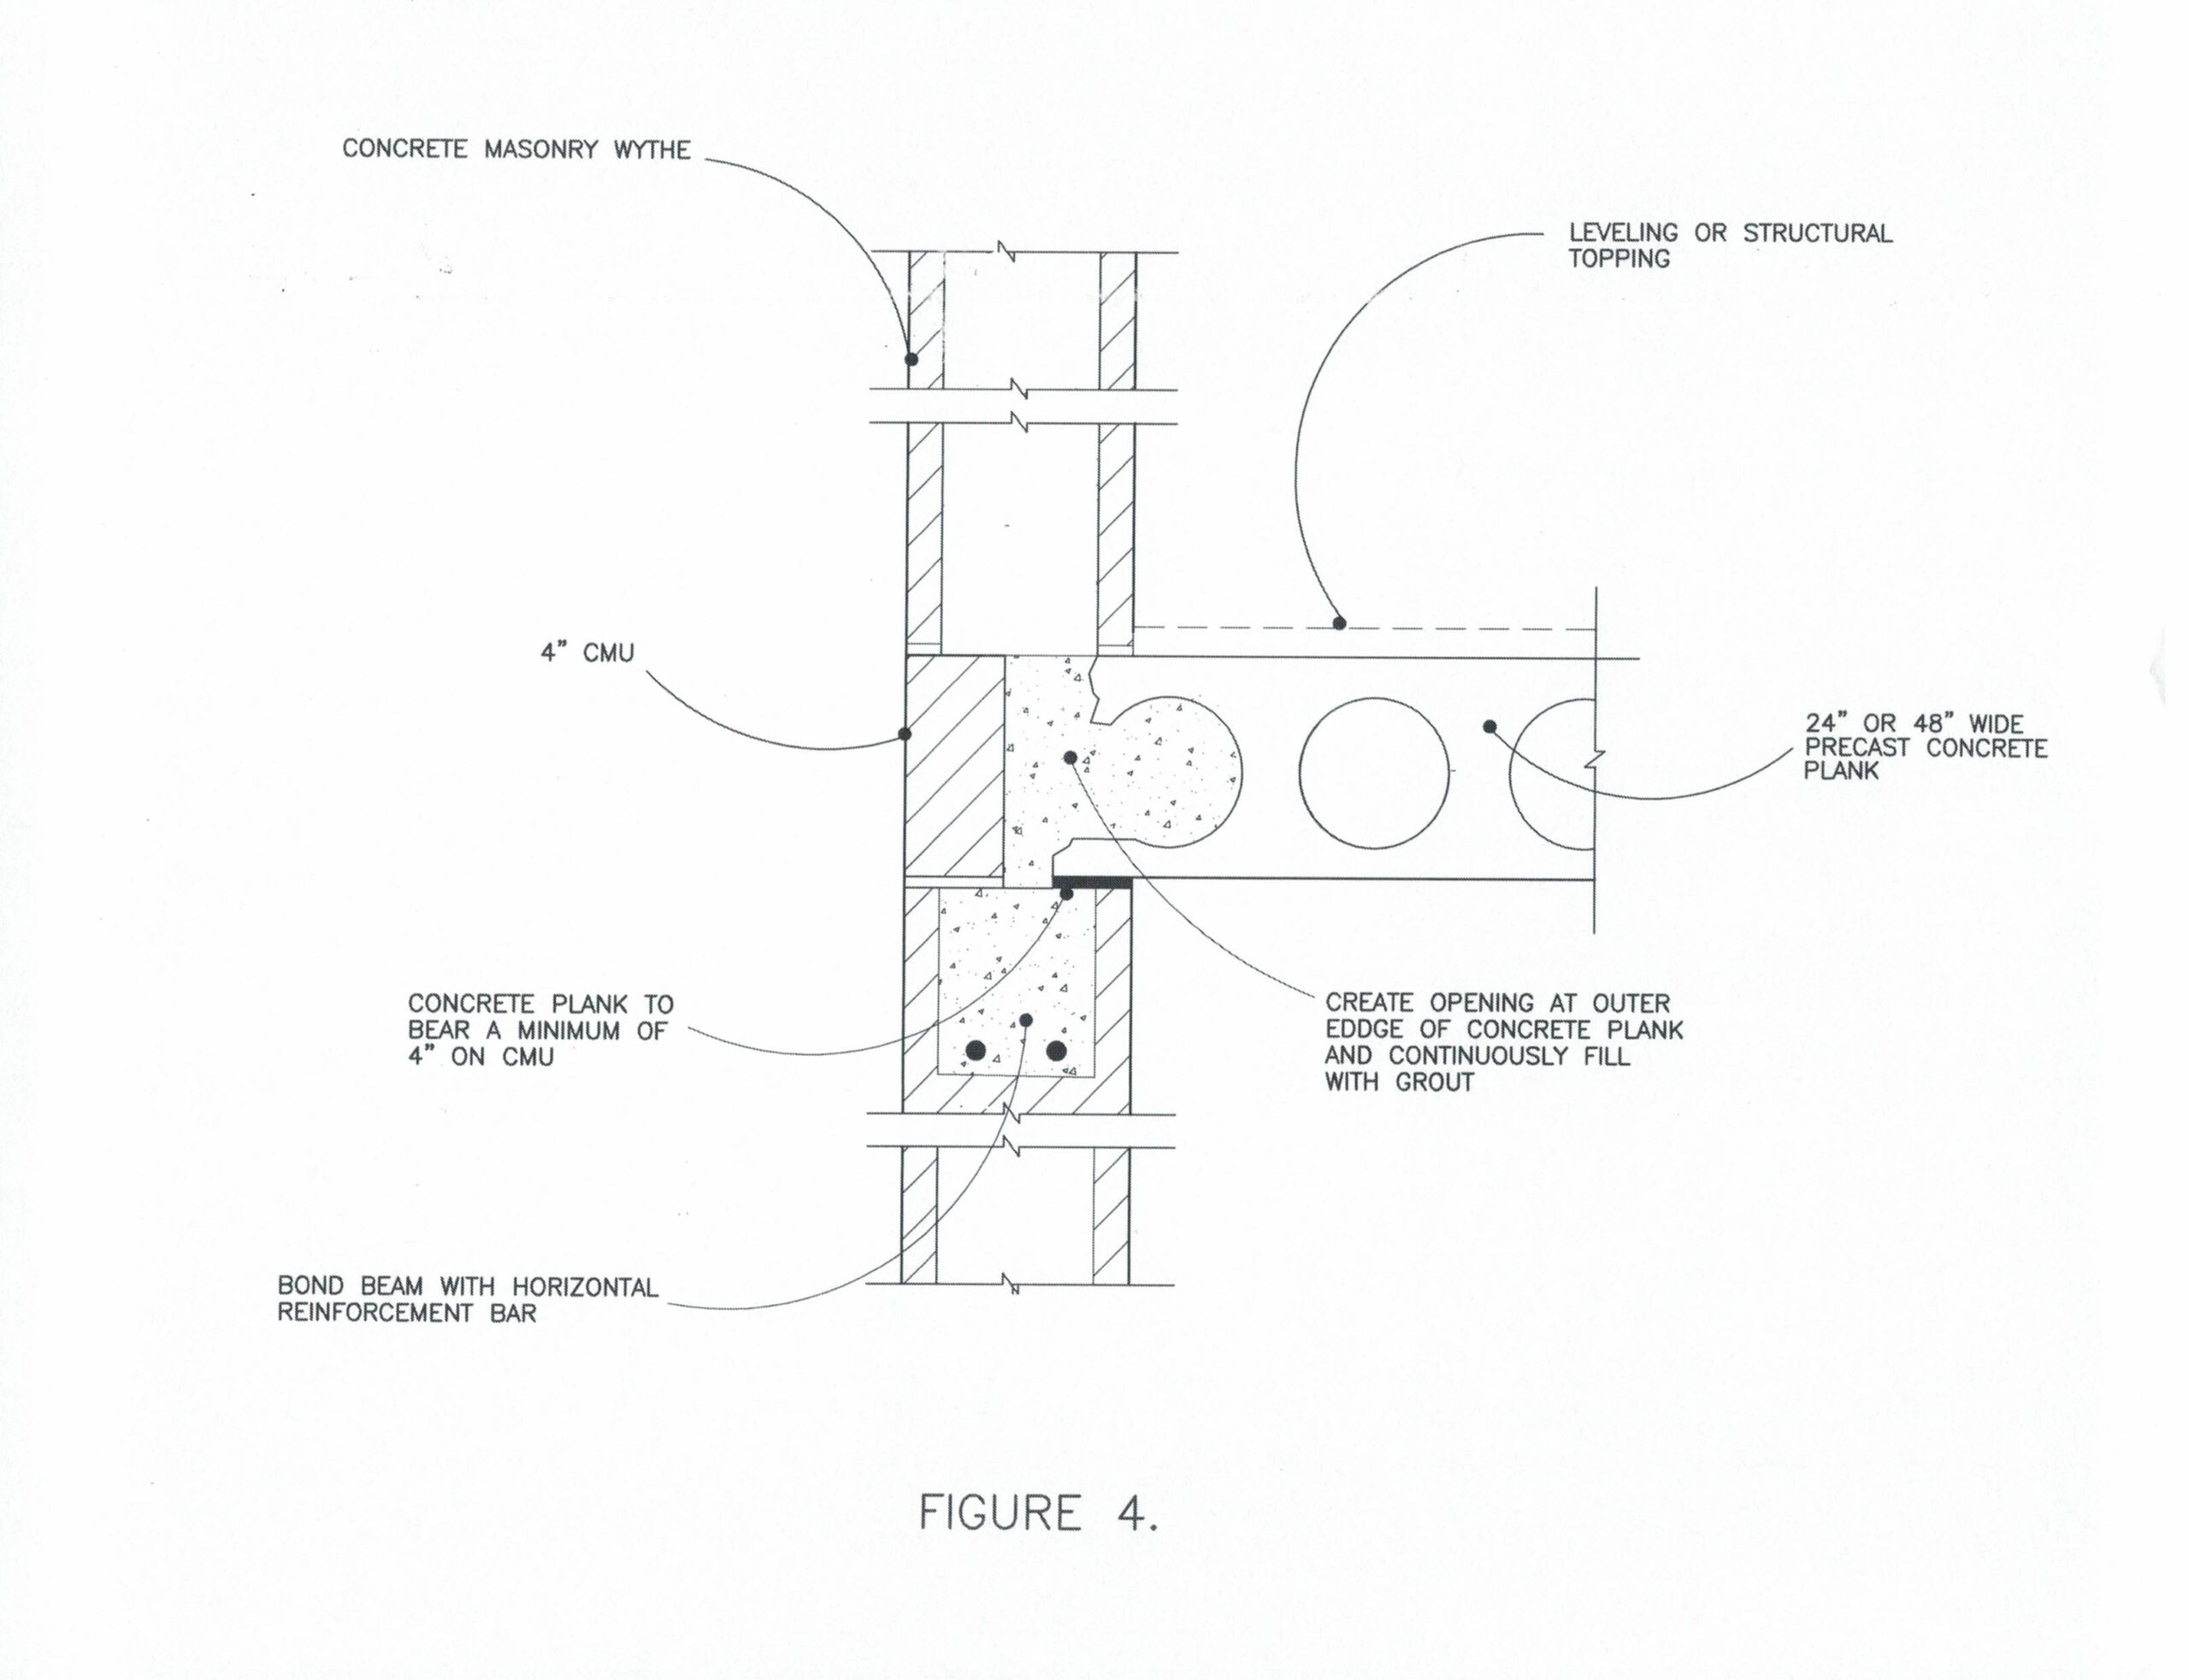
Another method of positively connecting the precast concrete plank to the concrete masonry wythe is to bear the precast concrete plank 3-inch to 4-inch onto the concrete masonry bond beam. Then an opening is created at the outer end of the concrete masonry wythe, exposing the precast concrete plank cores. Each core should be fitted with a Styrofoam grout plug in each of the precast concrete plank cores (if not provided by manufacturer). Then grout the cavity and precast concrete planks solidly. The grout will flow continuously throughout the cavity, creating a positive bond when the grout cures (Figure 4).
Answer these 5 Questions to receive your Continuing Education Credit
Thank you! Your answers will be reviewed and an email will be sent to you confirming accreditation.